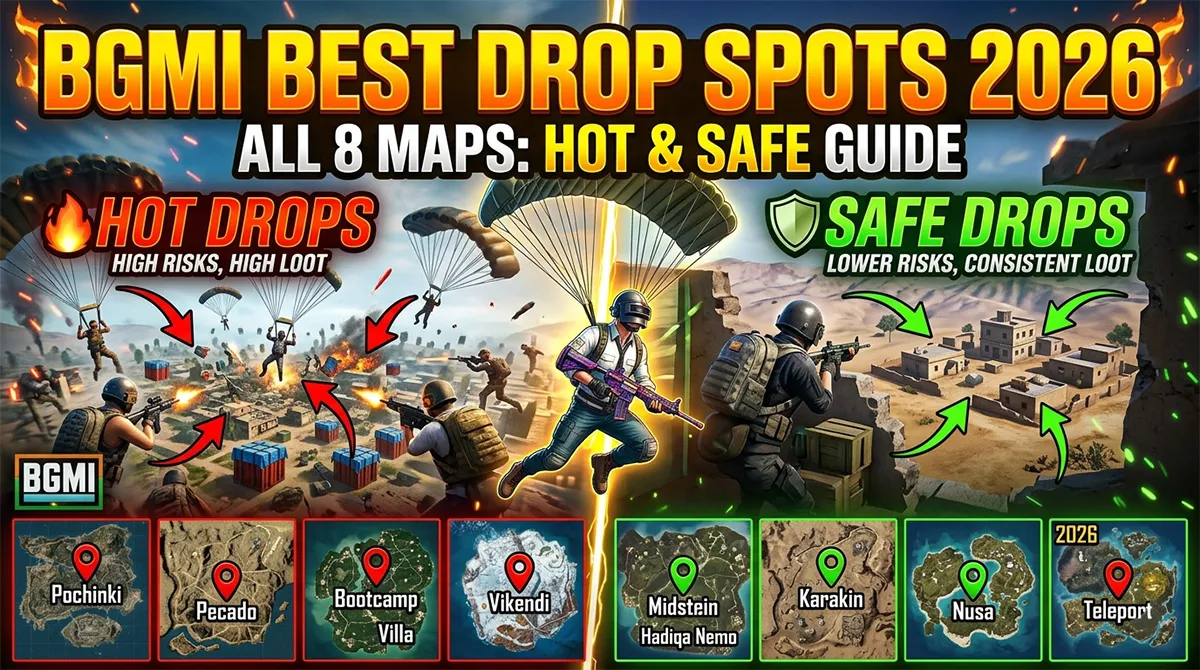
BGMI Best Drop Spots 2026: Master Every Map (Hot, Safe & Rank Push)
You jump from the plane. You scan the map. And in the three seconds you spend hesitating between Pochinki and that unnamed compound, three squads have already landed, grabbed weapons, and positioned themselves to kill you before your feet touch the ground.
Where you land is the single most important decision you make in every BGMI match. A good drop sets up your entire game — loot, positioning, rotations, and fight tempo. A bad drop gets you killed before the first circle even closes.
Most “best drop spots” guides give you a list of location names and call it a day. They won’t tell you that Pochinki is a death trap for solo beginners but a KD farm for experienced squads. They won’t explain that the same location plays completely differently depending on the flight path. And they certainly won’t cover all eight maps in one place.
This guide covers every BGMI map as of 2026 — Erangel, Miramar, Sanhok, Vikendi, Livik, Karakin, Nusa, and Rondo — with clear hot drop, safe drop, and rank-push recommendations organized by playstyle and skill level.
How to Read This Guide
Before diving into map-by-map breakdowns, here’s how the recommendations work:
Hot Drops: High-risk, high-reward locations. Expect early fights. Land here if you want kills, quick loot, and action within 30 seconds of landing. Best for aggressive players and squads.
Safe Drops: Low-risk locations with sufficient loot for the early game. You’ll have time to gear up before fighting. Best for rank pushing, solo players, and beginners learning the game.
Rank Push Drops: Locations optimized for survival time and placement points — the two factors that matter most for ranking up. Loot is adequate but fights are minimal until mid-game.
Erangel (8×8 km) — The Balanced Classic
Erangel is BGMI’s original map and still the most popular for ranked play. Its mix of urban centers, open fields, and coastal compounds supports every playstyle. The map hosts 100 players per match and rewards both aggression and patience.
Erangel Hot Drops
| Location | Risk Level | Squad Size | Notes |
|---|---|---|---|
| Pochinki | Extreme | Solo/Duo/Squad | Central town with dense buildings. 23% survival rate for squads engaging early. Loot is everywhere — ARs, Level 2-3 gear, meds. Expect 3-5 squads minimum. Land on rooftop for first weapon advantage. |
| Sosnovka Military Base | Very High | Squad | Southern island with best loot on the map. Level 3 gear spawns regularly. Major risk: if zone pulls north, escaping is difficult without a vehicle. |
| School & Apartments | Very High | Solo/Duo | Compact layout with rooftop access. High-tier loot in every classroom. Close-quarters chaos. Apartments nearby offer more cover. |
| Georgopol Containers | High | Squad | Northern container area with abundant ARs, DMRs, and scopes. Multiple teams fight for control of the shipping yard. Easy vehicle spawns for rotation. |
The BGIS 2026 Grand Finals confirmed Georgopol as the busiest zone on Erangel, with Vasista Esports, Genesis Esports, and NEBULA Esports all contesting the containers and surrounding regions. In Pochinki, MYTH Official and HeroXtreme Godlike battle for control of the central zone every match. These are not coincidences — these locations offer the best combination of loot density and rotational flexibility on the entire map.
Erangel Safe Drops
| Location | Risk Level | Squad Size | Notes |
|---|---|---|---|
| Mylta Power | Low | Solo/Duo/Squad | Southeastern industrial complex. Excellent loot with minimal competition. Most players overlook this spot. Easy vehicle rotation west toward the circle. |
| Primorsk | Very Low | Solo/Duo | Bottom-left coastal town. Far from main action but has all the loot you need for mid-game. Ideal for slow, safe starts. |
| Zharki | Very Low | Solo/Duo | Top-left corner. Peaceful with almost zero enemy presence. Loot is moderate but sufficient. Great for rank pushing without stress. |
| Kameshki | Low | Solo/Duo | Top-right coast. Safe with moderate loot. Easy rotation to Stalber or Prison if zone pulls inland. |
| Ferry Pier | Low | Solo/Duo | Underrated coastal spot with good mix of buildings. Usually ignored by other players. Boat and vehicle access for rotation. |
| Farm | Low | Any | Central location but surprisingly quiet. Decent loot spread across the area. Good vehicle spawns. |
For rank pushers, Mansion, Farm, and Sosnovka Island allow you to gather loot peacefully, away from the chaos of hot drop zones. These areas set you up for a stronger mid-game, fully equipped and ready for the shrinking circle with a higher chance of survival.
Erangel Rank Push Strategy
Your goal for ranking up is survival time + placement points. Land at Gatka, Primorsk, or Zharki — locations near the edge of the flight path where you’ll face at most one other player. Loot quickly, find a vehicle, and rotate early to the center of the first safe zone. Avoid Pochinki, School, and Military Base entirely. Those locations are KD farms, not rank-push zones.
Miramar (8×8 km) — The Desert Sniper’s Paradise
Miramar is an 8×8 km desert map with wide-open sightlines, rugged terrain, and minimal natural cover. Long-range weapons dominate. Vehicles are essential — walking across Miramar’s open plains is a death sentence. The map rewards patience, positioning, and sniper proficiency.
Miramar Hot Drops
| Location | Risk Level | Squad Size | Notes |
|---|---|---|---|
| Pecado | Extreme | Solo/Duo/Squad | Center-map boxing arena and surrounding buildings. The Miramar equivalent of School. Non-stop action, high-tier loot. Expect 3-5 teams every match. |
| Hacienda del Patrón | Very High | Solo/Duo | Isolated luxury estate with exceptional loot. High-risk because escape routes are limited. Win the early fight and you’re fully geared. |
| Los Leones | Very High | Squad | Largest city on the map. Church tower and central rooftops offer M416 with attachments within 15 seconds. Endless buildings, endless fights. |
| Water Treatment | High | Squad | Center-map industrial zone with high sniper and AR spawn rates. Open layout means you need to loot fast and move to cover immediately. |
For Miramar, Pecado and Los Leones are notorious for attracting the largest number of players. The BGIS 2026 Semi Finals revealed that San Martin is another mega-clash zone where Wyld Fangs, K9, and META Ninza all fight for control.
Miramar Safe Drops
| Location | Risk Level | Squad Size | Notes |
|---|---|---|---|
| Valle del Mar | Low | Squad/Duo | Southwestern coastal town. Solid loot, plentiful roads for vehicle access. Set up ambushes for players rotating from north. |
| Chumacera | Medium | Solo/Squad | Large military-style town in central position. Some early fights but thorough looting rewards patience with high-quality gear. |
| Secret Tunnels South of Los Leones | Low | Solo/Duo | Many players avoid Los Leones entirely, missing the tunnels directly south. ARs and marksman rifles spawn consistently. Loot in peace. |
| Islands North of Puerto Paraiso | Very Low | Solo/Duo | These islands rarely appear in flight path range. Premium loot with almost no competition when accessible. |
| Tierra Bronca | Very Low | Solo | Best drop if you want to avoid early battles entirely. Plenty of supplies and usually a vehicle nearby. |
| El Azahar | Very Low | Solo/Duo | Safe location with good loot for passive players. Perfect for rank pushing. |
Sanhok (4×4 km) — The Aggressive Player’s Playground
Sanhok is a 4×4 km tropical island where fights happen within seconds of landing. The map’s small size, dense jungle cover, and high loot density create a fast-paced environment where aggressive playstyles thrive. Matches typically last 20-25 minutes.
Sanhok Hot Drops
| Location | Risk Level | Squad Size | Notes |
|---|---|---|---|
| Bootcamp | Extreme | Squad | The most popular drop on Sanhok. Abundant loot for over five teams. Central building is chaos — land on the outer barracks if you want to survive. |
| Paradise Resort | Very High | Squad | Vibrant hotel blocks with lucrative loot inside rooms. Multiple buildings means fights spread out. |
| Quarry | High | Solo/Duo | Abandoned quarry with ample loot opportunities. Vertical terrain creates interesting combat dynamics. |
Sanhok Safe Drops
| Location | Risk Level | Squad Size | Notes |
|---|---|---|---|
| Camp Charlie | Medium | Solo/Duo | Similar characteristics to School on Erangel. Good loot without Bootcamp-level chaos. |
| Pai Nan | Low | Solo/Duo | Tranquil location with solid loot. Far from main hot zones. |
| Na Kham | Low | Solo | Western edge location loaded with loot. Great for tracking enemy movements without engaging. |
| Kampong | Very Low | Solo | Safe with good loot. Perfect for passive rank promoters. |
Vikendi (6×6 km) — The Snowy Tactical Map
Vikendi is a 6×6 km snow-covered map with distinctive landmarks, frozen rivers, and unique vehicle handling. Water bodies cover nearly 60% of the map, creating natural chokepoints at bridges.
Vikendi Hot Drops
| Location | Risk Level | Squad Size | Notes |
|---|---|---|---|
| Cosmodrome | Extreme | Squad | Upper-right corner. Expansive structure with loot for 3+ teams. Level 3 gear consistently spawns here. The go-to Vikendi hot drop. |
| Villa | Very High | Solo/Duo | High-tier loot in a compact estate. Multiple entry points. Close-quarters chaos. |
| Castle | High | Squad | Most popular Vikendi location. Central positioning. Multiple floors of loot. |
Vikendi Safe Drops
| Location | Risk Level | Squad Size | Notes |
|---|---|---|---|
| Dobro Mesto | Medium | Squad/Duo | Large town with spread-out loot. Less concentrated than Cosmodrome. |
| Winery | Low | Solo/Duo | Good loot with lower player traffic. |
| Dino Park | Low | Solo/Duo | Bottom-left location with uneven structures and ample loot. |
| Cement Factory | Low | Solo | Industrial site with decent gear and few visitors. |
Livik (2×2 km) — The Fast-Paced Nordic Map
Livik is a 2×2 km Nordic-themed map with the fastest match times in BGMI — typically 15 minutes. Its compact layout means you encounter enemies almost immediately. Exclusive weapons include the P90 SMG and MK12 assault rifle.
Livik Hot Drops
| Location | Risk Level | Squad Size | Notes |
|---|---|---|---|
| Midstein | Extreme | Squad | Center of the map. Non-stop gunfire from landing to rotation. Taller apartments in the middle have M416, SCAR-L, and sometimes Level 3 gear. Even with half the lobby dropping here, there’s enough loot for everyone. |
| Power Plant | Very High | Squad/Duo | Central industrial building. Amazing loot density — ARs, DMRs, scopes, attachments packed tightly. Tight corners and stairs create intense close-range fights. |
Livik Safe Drops
| Location | Risk Level | Squad Size | Notes |
|---|---|---|---|
| Blomster | Low | Squad/Duo | Northwest corner. Buildings are spread out. Plenty of ARs, DMRs, and Level 3 gear with zero early pressure. Land on rooftops first. |
| East Port | Low | Solo/Duo | Coastal location far from main zones. Warehouses and docks have solid loot — ARs, healing, scopes. Usually a vehicle nearby. |
| Crabgrass | Very Low | Solo | Less crowded area for players who want to avoid early fights. |
| Waterfall Cave | Low (Secret) | Solo/Duo | Hidden cave behind the central waterfall. Crazy good loot — Level 3 helmets, DMRs, medkits. Almost no one knows about it. Clear the entrance before looting. |
Karakin (2×2 km) — The Destructible Desert
Karakin is a 2×2 km desert map with 64 players and unique mechanics: Demolition Zone (replacing Red Zone), Sticky Bombs that destroy walls, and the Panzerfaust rocket launcher. Extensive underground tunnel systems create complex multi-level combat.
Karakin Hot Drops
| Location | Risk Level | Squad Size | Notes |
|---|---|---|---|
| Al Habar | Extreme | Squad | Urban combat core with rich loot in almost every building. The most contested Karakin drop. |
| Bashara | High | Squad/Duo | Balanced town landing with good loot distribution. |
| Bahr Sahir | High | Squad | Coastal rotation hub. Good loot plus vehicle access. |
Karakin Safe Drops
| Location | Risk Level | Squad Size | Notes |
|---|---|---|---|
| Hadiqa Nemo | Low | Solo/Duo | Offbeat rotation point. Less contested, adequate loot for early game. |
| Underground Tunnels | Low | Solo | Extensive bunker systems offer loot without surface exposure. Watch for campers at tunnel exits. |
Nusa (1×1 km) — The Smallest Battlefield
Nusa is BGMI’s smallest map at 1×1 km. Matches last only 8 minutes with 32 players. Unique features include ziplines for rapid traversal, elevators in hotels, zorb balls, and destructible structures. Pure action from start to finish.
Nusa Hot Drops
| Location | Risk Level | Notes |
|---|---|---|
| Science Centre | Extreme | Center of Nusa. Top hot drop due to abundant accessible loot — SMGs, Level 3 vests, armor, rifles. Multiple buildings packed tightly together. |
| Telepak Town | High | Southeastern location with good loot concentration. |
Nusa Safe Drops
| Location | Risk Level | Notes |
|---|---|---|
| Crystal Bay | Low | Coastal location with sufficient loot and fewer early fights. |
| Peripheral Buildings | Very Low | Any unnamed cluster of buildings on the map edge gives you breathing room before the 8-minute chaos begins. |
Rondo (8×8 km) — The Newest Battlefield
Rondo is the newest map, introduced in the BGMI 3.7 update alongside PUBG Mobile. It’s the largest map in the game at 8×8 km, supporting 100 players with a hybrid urban-nature terrain combining modern cityscapes with natural elements. Rondo features over 20 named locations, escalators for vertical movement in urban areas, EMP zones that disable electronics, and an innovative shop system.
Note: Rondo is not currently permitted in BGIS 2026 competitive matches, where only Erangel and Miramar are used.
Rondo Hot Drops
| Location | Risk Level | Squad Size | Notes |
|---|---|---|---|
| Jadena City | Extreme | Squad | “Chaos Capital” — massive urban hot drop with skyscrapers, paved streets, and escalators. Stadium is prime for early fights and good loot. Watch for snipers on rooftops. |
| NEOX Factory | Very High | Squad | Center-map industrial area with automobile factory and test track. Popular for vehicle spawns (Blanc car) and central positioning. Beware campers in higher stories and unfinished vehicles used as hiding spots. |
| Renang & Low H Shine (Premium Stores) | High | Squad | High-loot zones guarded by AI NPCs providing airdrop-level items like MG3s and Level 3 armor after defeating guards. |
Rondo Safe Drops
| Location | Risk Level | Squad Size | Notes |
|---|---|---|---|
| Jao Tin | Medium | Solo/Duo | Theater offers vantage points for spotting enemies. Decent loot with ziplines for quick escapes. Balanced start with moderate risk. |
| Rin Jiang | Low | Solo/Duo | Scenic riverside village with restaurants and water access. Good for initial looting before rotating via boats. |
| Yu Lin | Very Low | Solo | Dense forest area with thick vegetation. Perfect for stealthy play. Low visibility favors ambushes and close-range fights. |
| Test Track | Low | Solo/Duo | Adjacent to NEOX Factory. Suitable for low-profile looting and vehicle testing. Fewer players than the main factory. |
How to Land Faster Than Everyone Else
Choosing the right spot means nothing if you land 5 seconds after the enemy. Here’s how to beat opponents to the ground every time.
Optimal Jump Distances by Map
| Map | Optimal Jump Distance | Technique |
|---|---|---|
| Erangel | 750m | Jump at 750m, fly sideways with slight upward tilt. Deploy parachute as late as possible. |
| Miramar | 780m | Same as Erangel. Extra distance compensates for desert terrain elevation changes. |
| Sanhok | 400-500m | Smaller map = shorter jumps. Parachute deploys faster at lower altitudes. |
| Vikendi | 600m | Medium map distance. Watch for snowy terrain elevation. |
| Livik | 450m | Compact map. Fast deployment critical — enemies land within seconds. |
| Karakin | 350m | Smallest regular map. Jump almost directly above target for fastest landing. |
| Nusa | 200-300m | Tiny map. Direct vertical drops work best. |
| Rondo | 750m | Same as Erangel. Large map, standard jump distance applies. |
The 45-Degree Angle Descent
Initiate your jump when you are at the optimal distance from your target. Fly sideways with a slight upward tilt on the joystick. This 45-degree angle maximizes horizontal distance while maintaining a fast descent speed. Too steep and you’ll overshoot. Too shallow and you’ll arrive late.
The Late Parachute Deploy
The parachute should deploy as late as possible — ideally just a few meters before landing. The BGMI 4.2 update tweaked parachute mechanics to allow this, giving skilled players an even bigger advantage over those who deploy early.
The “Push Forward” Landing Boost
When your parachute opens, press forward on the joystick. You’ll swing forward and land faster than players who stay neutral. Combine this with the late deploy for maximum speed.
Playstyle Matrix: Which Drop Matches Your Game?
| Playstyle | Best Map | Hot Drop Pick | Safe Drop Pick | Goal |
|---|---|---|---|---|
| Aggressive / High KD | Sanhok, Livik | Bootcamp, Midstein | — | Maximum kills per match |
| Balanced / Rank Push | Erangel | — | Mylta Power, Primorsk | Top 10 with 3-5 kills |
| Passive / Survival | Erangel, Miramar | — | Zharki, El Azahar | Top 3 placement |
| Sniper / Long Range | Miramar | Water Treatment | Valle del Mar | High-damage games |
| Solo Player | Erangel, Karakin | — | Kameshki, Hadiqa Nemo | Controlled 1v1s |
| Squad Leader | Erangel, Rondo | Pochinki, Jadena City | — | Coordinated team fights |
| Beginner | Erangel | — | Farm, Ferry Pier | Learn mechanics safely |
| Content Creator | Livik, Nusa | Midstein, Science Centre | — | High-action clips |
Common Drop Mistakes That Get You Killed
Mistake 1: Jumping too early. If you jump at 1000m+ from the target, you’ll float for 30 extra seconds while enemies are already looting. Always jump at the optimal distance for your map.
Mistake 2: Landing on the exact building marker. Mark the building, but aim to land on the rooftop or the entrance. Landing directly on the marker means you might clip a wall and fall — costing precious seconds.
Mistake 3: Not checking the flight path. A location that’s a “safe drop” when the plane flies north becomes a hot drop when the plane flies directly over it. Always check the flight path before committing to your drop. An 8×8 km map has several named areas, each with its own risk level and loot quality — but that risk changes based on plane trajectory.
Mistake 4: Hot dropping without a squad plan. If you’re landing Pochinki or Pecado with randoms who scatter to different buildings, you’re already dead. Hot drops only work with coordinated squads who clear buildings together.
Mistake 5: Sticking to one drop spot every match. The best players adapt their drop to the flight path, circle predictions, and lobby difficulty. A rigid drop strategy makes you predictable and limits your map knowledge.

BGMI style name generator
BGMI Style Name Generator – Stylish Fonts, Symbols & Cool Tags Free Your BGMI name shows up everywhere…
BGMI KD Calculator — Check Your KD Ratio Instantly
BGMI KD Calculator – Check Your KD Ratio Instantly Are you curious about your Kill/Death (KD) ratio in Battlegrounds Mobile…

BGMI Invisible Name Copy Paste Tool — Blank Space Characters
About This BGMI Invisible Space Tool You’re here because you searched for a way to add blank spaces…
BGMI Symbols Copy Paste
Best BGMI Name Symbols (300+ Stylish & Unique Copy-Paste Characters) Want to make your BGMI profile stand out in the…
BGMI Sensitivity Code Generator
Free BGMI Sensitivity Code Generator: No Recoil in 2026 Are you tired of copying the wrong pro player…

BGMI Account Value Estimator – Check Account Price
💰 How Much Is Your BGMI Account Worth in 2026? If you’ve spent thousands of UC on Mythic…
Frequently Asked Questions
What is the best drop spot in BGMI for high KD?
For pure kill count, land at Bootcamp (Sanhok) or Midstein (Livik). These locations attract the most players per square meter, giving you maximum fight opportunities immediately. For Erangel, Pochinki consistently produces the highest KD games in the 2026 meta.
Where should beginners land in BGMI?
Beginners should land at Farm (Erangel), Zharki (Erangel), or Tierra Bronca (Miramar). These locations offer adequate loot with minimal early-game pressure, giving new players time to learn looting mechanics, weapon handling, and rotation timing without immediate combat.
What is the safest drop spot in BGMI for rank pushing?
Zharki (Erangel) and El Azahar (Miramar) are the safest drops for rank pushing. These locations are at the map edges, rarely contested, and provide enough loot for mid-game. The key to rank pushing is survival time and placement points — not kills. Land safe, loot fast, and rotate early.
Which map is best for ranking up in BGMI?
Erangel remains the optimal choice for ranking up due to its large 8×8 km size, balanced terrain, and survival opportunities. The map gives you time to loot, rotate, and position before fights. Smaller maps like Livik and Nusa suit aggressive play but are riskier for consistent rank progression.
How do I land faster than other players in BGMI?
Jump at the optimal distance for your map (750m for Erangel/Miramar, 450m for Livik), use the 45-degree angle descent technique, deploy your parachute as late as possible, and press forward on the joystick when the chute opens for the final speed boost. The BGMI 4.2 update allows parachutes to deploy just meters before landing.
What are hot drops in BGMI?
Hot drops are high-risk, high-reward landing zones where large numbers of players converge due to abundant high-tier loot. Examples include Pochinki and School (Erangel), Pecado (Miramar), Bootcamp (Sanhok), Cosmodrome (Vikendi), and Midstein (Livik). These locations produce intense early-game combat.
Is Rondo a good map for ranked BGMI?
Rondo is the newest map and features excellent loot distribution and innovative mechanics like escalators and AI-guarded premium stores. However, it is not currently permitted in BGIS 2026 competitive matches. For casual ranked play, it offers a fresh experience with diverse terrain. For serious rank pushing, stick to Erangel.
Related BGMI Tools & Guides
-
BGMI Ping Optimizer 2026 — Your drop spot means nothing if your ping is 120ms. Fix your connection first.
-
Best BGMI Sensitivity Codes 2026 — Once you’ve landed and looted, your sensitivity settings determine whether you win the fight.
-
Best Phones Under 15000 for BGMI — The right phone prevents frame drops during those critical landing fights.
-
How to Buy BGMI UC Cheap in India — Fund your Royale Pass with smart UC purchase strategies.
-
BGMI Empty Space Copy Paste Tool — Style your IGN before you dominate the drop zone.