BGMI Map Guide 2026 Master Erangel, Miramar & Sanhok
You drop. You loot. You die within 90 seconds.
The kill feed shows you got picked off by a squad that landed 5 seconds before you, already had weapons, and was holding the rooftop you should have avoided entirely. Sound familiar?
Understanding BGMI’s maps isn’t optional for anyone serious about ranking up. It’s the difference between a 3-kill game where you die in the first circle and a 12-kill Chicken Dinner where you controlled every engagement.
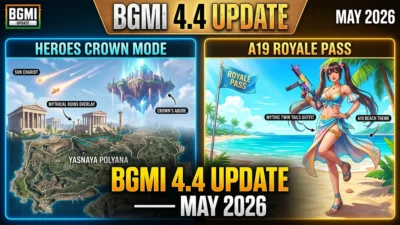
Most map guides give you a list of location names and call it a day. They won’t tell you that Pochinki has a 23% squad survival rate. They won’t mention that Erangel is about to undergo a massive visual overhaul in the 4.4 update on May 21, 2026, with locations like Yasnaya Polyana and Mylta being reimagined as mythical ruins. And they certainly won’t explain which map matches your specific playstyle and ranking goals.
This guide covers BGMI’s three core maps — Erangel, Miramar, and Sanhok — with consistent hot drop, safe drop, loot zone, and rotation analysis that actually reflects the 2026 meta.
The Three BGMI Maps: A Quick Comparison
BGMI offers eight battle royale maps, but three form the backbone of the game’s competitive and ranked ecosystem. Only Erangel and Miramar are permitted in BGIS 2026 competitive matches, which tells you everything about where Krafton focuses its balance efforts.
Here’s how they differ at a glance:
| Aspect | Erangel | Miramar | Sanhok |
|---|---|---|---|
| Size | 8×8 km | 8×8 km | 4×4 km |
| Players | 100 | 100 | 100 |
| Terrain | Island (48% water) | Desert (80% land) | Tropical jungle (50% water) |
| Game Pace | Balanced | Slow & strategic | Fast & aggressive |
| Ideal Weapon Loadout | M416 + DMR (Mini14/SKS) | Sniper (M24/Kar98k) + AR | SMG (Vector/UMP) + M416 |
| Vehicle Importance | Important | Very important | Rarely needed |
| Competitive Status | ✅ BGIS 2026 | ✅ BGIS 2026 | ❌ Not in BGIS |
| Foliage Cover | 45% | Minimal (10%) | 43% (dense jungle) |
| Playstyle Fit | All types | Snipers, tacticians | Aggressive, CQC fighters |
Data compiled from TalkEsport maps overview and Nomadnest28 comparison guide.
Erangel (8×8 km): The Balanced Classic
Erangel is BGMI’s original map and remains the most popular for ranked play. It features a balanced mix of urban centers, open fields, coastal compounds, and water bodies covering 48% of the total area. The map supports every playstyle — from close-quarters brawlers in Pochinki to passive survivalists in Zharki.
Coming Soon — 4.4 Update (May 21, 2026): The upcoming Ancient Rome theme will transform Yasnaya Polyana, Ruins, Ferry Pier, and Mylta into grand mythical ruins with towering statues and reimagined architecture. This will fundamentally change the loot density and rotation dynamics of these locations. If you’ve memorized these spots, be ready to relearn them.
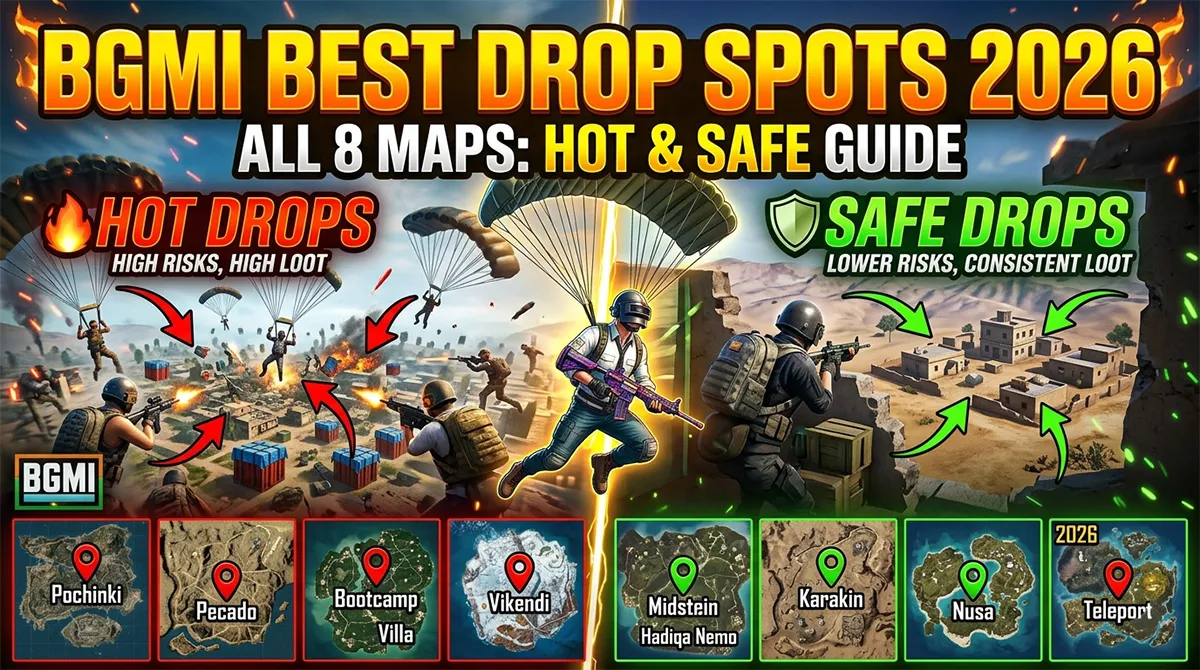
Erangel Hot Drops: High Risk, Maximum Loot
| Location | Risk Level | Best Squad Size | What You Get | What You Risk |
|---|---|---|---|---|
| Pochinki | Extreme 🔴 | Squad | ARs, Level 2-3 gear in every building. Central position. | 23% squad survival rate. 3-5 teams minimum. Expect instant combat. |
| Sosnovka Military Base | Very High 🔴 | Squad | Best loot density on Erangel. Level 3 gear consistent. | Bridge campers on exit. Dead if zone pulls north without a vehicle. |
| School & Apartments | Very High 🔴 | Solo/Duo | Rooftop weapons for first advantage. Compact, fast loot. | Stairwell campers. Roof vs. hall engagements immediate. |
| Georgopol Containers | High 🟠 | Squad | High-quality ARs, snipers, Level 3 gear. | Cranes for sniper overwatch. Multiple squads fight for shipping yard. |
| Yasnaya Polyana | High 🟠 | Squad | Dense urban blocks with abundant loot. | Massive area makes squad splitting dangerous. 4.4 update changes incoming. |
Pochinki’s central location is both its greatest strength and its deadliest curse. You’ll find assault rifles, armor, backpacks, and healing items in almost every building. But that 23% survival rate means that in four out of five matches, your squad doesn’t leave Pochinki alive. Land on the rooftops first, control a single building block as a team, and always know your vehicle exit route before the first circle closes.
Erangel Safe Drops: Low Risk, Rank Push
| Location | Risk Level | Best For | Why It Works |
|---|---|---|---|
| Mylta Power | Low 🟢 | Solo/Squad | Southeastern industrial. Excellent loot, minimal competition. Vehicle rotation west. |
| Primorsk | Very Low 🟢 | Solo | Bottom-left coast. Far from main action. All loot needed for mid-game. |
| Zharki | Very Low 🟢 | Solo/Duo | Top-left corner. Almost zero enemy presence. Adequate supplies. |
| Kameshki | Low 🟢 | Solo/Duo | Top-right coast. Safe, moderate loot. Easy rotation inland. |
| Farm | Low 🟢 | Any | Central but surprisingly quiet. Decent spread of loot and vehicles. |
| Ferry Pier | Low 🟢 | Solo/Duo | Underrated coastal spot. Good building mix. Boat and vehicle access. |
For rank pushers, the goal is survival time + placement points. Mylta Power, Primorsk, and Zharki let you loot in peace for 3-4 minutes, grab a vehicle, and rotate to the circle center before the first engagement is forced upon you. These drops won’t produce highlight-reel 15-kill games, but they’ll consistently get you to top 10 — which is exactly what ranking up requires.
Erangel Rotation Strategy
Erangel has many main roads and open areas. Use vehicles like the UAZ, Dacia, or Buggy to cover ground as the circle shrinks. But don’t spend too much time on roads — vehicles broadcast your position through sound and map icons.
Key rotation principles:
-
After looting your drop zone, rotate to the circle center within 2 minutes
-
Avoid straight-line paths. Use hills, tree lines, and house clusters as cover
-
If the final circle is in open terrain, smoke grenades are your most valuable item
-
Ideal Erangel loadout: M416 + DMR (Mini14 or SKS) for mid-to-long range flexibility
Miramar (8×8 km): The Desert Sniper’s Paradise
Miramar is an 8×8 km desert-themed map inspired by Mexico’s arid landscapes, with the highest land coverage of any BGMI map at 80%. It was the second map introduced and contrasts sharply with Erangel’s green, water-heavy terrain. This map is built for long-range combat — wide open sightlines, rugged hills, and urban settlements spread far apart.
Miramar punishes poor positioning more than any other BGMI map. New players often lose here because they treat it like Erangel, running across open desert without cover or vehicles. The map rewards patience, accuracy, and vehicle mastery.
Miramar Hot Drops: Where the Action Lives
| Location | Risk Level | Best Squad Size | What You Get | What You Risk |
|---|---|---|---|---|
| Pecado | Extreme 🔴 | Solo/Duo/Squad | Center-map boxing arena. High-tier loot everywhere. | Sometimes one-third of all squads land here. Constant action. |
| Hacienda del Patrón | Very High 🔴 | Solo/Duo | Isolated luxury estate with exceptional loot density. | Limited escape routes. Win the early fight or die trying. |
| Los Leones | Very High 🔴 | Squad | Largest city. Church tower and rooftops have M416 + attachments in 15 seconds. | Endless buildings, endless fights. Easy to get separated from squad. |
| Water Treatment | High 🟠 | Squad | Center-map industrial. High-tier sniper and AR spawns. | Open layout means you must loot fast and move to cover immediately. |
Pecado in ranked mode is infamous — especially the boxing arena and casino hotel. If you land on the casino rooftop, you can loot the penthouse, which almost always spawns an M416 with extended mag. But you’ll be fighting for it against multiple teams simultaneously.
Miramar Safe Drops: Smart Looters Survive
| Location | Risk Level | Best For | Why It Works |
|---|---|---|---|
| Valle del Mar | Low 🟢 | Squad/Duo | Southwestern coastal town. Solid loot, plentiful roads. Ambush setup for north rotations. |
| Chumacera | Medium 🟡 | Solo/Squad | Central military town. Thorough looting rewards with high-quality gear. Good rotation hub. |
| Secret Tunnels South of Los Leones | Low 🟢 | Solo/Duo | ARs and marksman rifles consistently spawn. Almost completely ignored by other players. |
| Islands North of Puerto Paraiso | Very Low 🟢 | Solo/Duo | Rarely in flight path range. Premium loot, zero competition when accessible. |
| Tierra Bronca | Very Low 🟢 | Solo | Safest Miramar drop. Plenty of supplies. Vehicle usually nearby. |
Miramar Rotation Strategy
On Miramar, vehicles are not optional — they’re essential. The distances between compounds make safe foot rotation nearly impossible.
Key rotation principles:
-
Secure any vehicle before the first circle starts shrinking
-
Use valleys and hillsides as routes — avoid major roads where snipers post up
-
Electric vehicles (introduced in recent updates) reduce engine noise for stealth rotations
-
For squad play, the UAZ (closed top) provides the best passenger protection
-
Always park a backup vehicle near your position when you stop to engage
Winning Miramar tactics:
-
Always prioritize finding a 4x or 6x scope. Without magnification, you lose every long-range exchange
-
Control high ground — ridges and hills let you spot enemies across enormous distances
-
Use smoke grenades to cross any open ground. Popping smoke before sprinting saves lives
-
In ranked, avoid Pecado unless you’re supremely confident in your early gunfight skills
-
Stay near the circle center rather than the edge — this keeps enemies in front of you
Ideal Miramar weapon loadout: Sniper rifle (Kar98k, M24, or AWM) as primary, assault rifle as secondary. Avoid shotguns and SMGs as primary weapons — the map rarely forces close-quarters encounters unless you’re clearing compounds.
Sanhok (4×4 km): The Aggressive Player’s Playground
Sanhok is a 4×4 km tropical island where matches unfold with relentless speed. It’s half the size of Erangel and Miramar but packs the same 100 players into dense jungle terrain with 43% foliage coverage. The result: close-quarters combat happens within seconds of landing, and matches rarely exceed 22 minutes.
This is the map for aggressive players. Speed, reflexes, and recoil control matter more than long-term strategy. The dense vegetation enables stealth and ambush tactics that are impossible on Miramar’s open desert.
Important note: Sanhok is not permitted in BGIS 2026 competitive matches. It’s strictly a casual and ranked mode map. If you’re training for tournaments, focus your practice on Erangel and Miramar.
Sanhok Hot Drops: Chaos From the First Second
| Location | Risk Level | Best For | What You Get |
|---|---|---|---|
| Bootcamp | Extreme 🔴 | Squad | The most brutal drop in BGMI. Military compound with abundant weapons. Central building is chaos — land on outer barracks first. |
| Paradise Resort | Very High 🔴 | Squad | Vibrant hotel blocks full of rooms with loot. Balcony fights common. Multiple buildings spread out the initial chaos. |
| Ruins | High 🟠 | Solo/Duo | Northwest corner. Ancient architecture. Abundant medical supplies, weapons, and armor. High-risk environment. |
| Camp Alpha | High 🟠 | Squad | Military-style camp with solid loot. Less chaotic than Bootcamp. |
Bootcamp is the Sanhok equivalent of Pochinki dialed to maximum intensity. It’s centrally located — almost never out of the flight path — and consists of multiple buildings surrounding a large open courtyard. Landing here means accepting that you’ll fight within 5 seconds of touching the ground.
Sanhok Safe Drops: Where Beginners Survive
| Location | Risk Level | Best For | Why It Works |
|---|---|---|---|
| Camp Charlie | Medium 🟡 | Solo/Duo | Good loot without Bootcamp-level chaos. Balanced start. |
| Pai Nan | Low 🟢 | Solo/Duo | Straddles a river in the southeast. Central enough for action without being overrun. Top pick for smart drop. |
| Docks | Low 🟢 | Solo/Duo | Coastal location. High-level loot. Boats available for water escape if surrounded. |
| Khao | Low 🟢 | Solo | Edge location. Perfect for players who want to gear up before pushing into fights. |
Sanhok Rotation Strategy
Because the map is small, vehicles are rarely needed — rotation is more effective on foot using vegetation as cover.
Key rotation principles:
-
Move from one cover to another — rocks, houses, trees. Never sprint across open ground
-
Use smoke grenades to close gaps when cover is unavailable
-
Don’t linger in the center of the map. It’s safer to rotate around the edges of the circle.
-
Use a quality headset. Sound is your most valuable tool on Sanhok — footsteps through trees give away enemy positions before you see them.
Ideal Sanhok weapon loadout: High rate-of-fire weapons like the Vector, UMP, or M416. Avoid prolonged open combat — flank quickly. Use Molotov cocktails or frag grenades to force enemies out of cover. The QBZ assault rifle replaces the SCAR-L on Sanhok — learn its recoil pattern.
Which Map Should You Play?
Your map choice should align with your goals — not what’s popular.
| Your Goal | Best Map | Why |
|---|---|---|
| Rank Push | Erangel | Most balanced. Large size gives you space to survive. Consistent top-10 placement possible with safe drops. |
| KD Farming | Sanhok | Maximum action density. Bootcamp and Paradise Resort deliver kills per minute unmatched by any other map. |
| Sniper Practice | Miramar | Long sightlines, open terrain. This is where you master bolt-action headshots. |
| Competitive Training | Erangel + Miramar | Only maps in BGIS 2026. Practice both equally. |
| Beginner Learning | Erangel | Forgiving terrain, multiple safe drops, vehicle availability. |
| Aggressive Play | Sanhok | Fast-paced, close-quarters, high loot density. Non-stop action from drop to dinner. |
| Tactical/Squad Play | Miramar | Rewards coordination, positioning, and patience. Punishes bad decisions harshly. |
The 4.4 Update: What’s Changing on May 21, 2026
The upcoming BGMI 4.4 update brings the biggest Erangel transformation in years. Several core urban areas are receiving a complete visual and structural redesign under the “Ancient Rome” / “Mythical Ruins” theme.
Locations confirmed for overhaul:
-
Yasnaya Polyana — expected to become a grand mythical ruin complex
-
Ruins — already ancient, becoming even more dramatic
-
Ferry Pier — reimagined with mythical architecture
-
Mylta — redesign into ruins-style terrain
The update also introduces the Panzerfaust and JS9 SMG as standard ground loot across all classic maps, plus the new Roadster vehicle available on Classic Erangel, Themed Erangel, and Classic Livik.
What this means for your drop strategy: If you’ve memorized the exact building layouts of Yasnaya or Ferry Pier, expect to relearn them. The loot distribution may shift. The first week after the 4.4 update drops will be chaotic — everyone will want to explore the new locations. Consider using safe drops during this period until the new meta settles.
Frequently Asked Questions
What is the best map in BGMI for ranking up?
Erangel is the best map for consistent ranking up. Its large 8×8 km size gives you space to loot safely, its balanced terrain supports every playstyle, and its wide vehicle availability ensures you can rotate even from edge drops. Unlike Sanhok, you won’t be forced into early fights. Unlike Miramar, you won’t be punished for a single positioning mistake in open desert.
Where should beginners land on Erangel?
Beginners should land at Farm, Primorsk, or Zharki on Erangel. These locations offer adequate loot with minimal early-game pressure, giving new players time to learn looting mechanics, weapon handling, and rotation timing. Avoid Pochinki, School, and Military Base until you’ve built confidence in gunfight mechanics.
Why is Miramar considered the hardest BGMI map?
Miramar has the least natural cover (only 10% foliage vs 45% on Erangel), the longest sightlines favoring sniper combat, and the largest distances between compounds — making vehicles mandatory. A single bad rotation across open desert gets you eliminated with no counterplay. The map rewards patience and punishes aggression, which is the opposite of how most players approach battle royale games.
Is Sanhok good for competitive BGMI?
No. Sanhok is not permitted in BGIS 2026 competitive matches, where only Erangel and Miramar are used. For casual ranked play, Sanhok is excellent for fast-paced action and KD farming, but if you’re training for tournaments, invest your practice time in Erangel and Miramar.
How does the BGMI 4.4 update change Erangel?
The 4.4 update (expected May 21, 2026) transforms Yasnaya Polyana, Ruins, Ferry Pier, and Mylta into mythical ruins with Ancient Rome-themed visual overhauls. New weapons (Panzerfaust, JS9 SMG) and the Roadster vehicle are also being added to Erangel.
What is the safest drop spot on Miramar?
Tierra Bronca and the Islands North of Puerto Paraiso are the safest Miramar drops. Tierra Bronca consistently has minimal competition, sufficient supplies, and a nearby vehicle. The northern islands are only accessible on certain flight paths but offer premium loot with near-zero early-game threat.

BGMI Pro Player IDs 2026: Jonathan, Mortal, Scout, Dynamo
Verified BGMI IDs for Jonathan, Mortal, Scout, Dynamo & more top streamers. Includes in‑game setups, device details, and how to avoid fake…

BGMI Best Drop Spots 2026: All 8 Maps Hot & Safe Guide
Master every BGMI map with the best drop spots for 2026. Hot drops for high KD, safe drops for rank push. All…
BGMI Ping Optimizer 2026: Fix Lag & Reduce Ping
BGMI ping optimizer, BGMI fix lag, reduce ping BGMI, BGMI high ping solution, BGMI best server settings, BGMI ping 20ms, BGMI lag…
Related BGMI Tools & Guides
-
BGMI Drop Spots 2026: All 8 Maps — Complete hot drop and safe drop guide for every BGMI map including Livik, Vikendi, and Rondo
-
BGMI Ping Optimizer 2026 — Fix high ping before you drop. A 20ms connection changes everything.
-
Best BGMI Sensitivity Codes 2026 — Map knowledge means nothing without the aim to execute. Pro-tested sensitivity for every device.
-
Best Phones Under 15000 for BGMI — These maps deserve a phone that can render them smoothly.